

Brake System Information
DISCLAIMER
The information provided here is for general guidance purposes only. It is a combination of manufacturer guidance, first- and second-hand experience, and personal opinion. It may me inaccurate, incomplete, or outdated.
Brakes are absolutely critical for safety so no matter what you do, always make sure the functionality of your braking system is your number one priority. It’s important to state that up front because part of this Information Page will cover common complaints about the factory braking systems and the solutions to address those complaints will actually involve reducing braking performance.
Warning: Reduction of a braking system’s performance capabilities can lead to serious harm or total loss of persons and/or property. Do not make any changes that would cause a braking system to be incapable of performing as required.
There are three general braking systems used on Gaydon-era Aston Martins: the early setup with 4-piston calipers in the front and rear, the later setup with 6-piston calipers in the front and 4-piston calipers in the rear, and the system that uses Carbon Ceramic Material (CCM) brake rotors. I’ll detail each of those in the first section and then cover maintenance items in their own sections.
Brake dust and brake squeal are common complaints from Aston Martin owners. I cover that in the Brake Pads section.
Note: Any brake pad can have brake squeal. This can be due to any number of factors. Read the General Brake Information section below for more details.
Return to Information Pages index
Jump to Section
General Brake Info
Brakes are found on every car and, aside from a few things, there’s nothing particularly special or peculiar about one set to the next. If you want to learn more about brakes in general, there’s a massive amount of information on the internet that will cover every facet of them. This Information Page is based on information about brakes specifically as they relate to Aston Martins, for the sake of helping owners better understand their cars.
Brake Dust and Brake Squeal
This is the biggest and most common complaint from Aston Martin owners. I cover this a bit in the Brake Pads Section below since brake pads are a major factor in this complaint, but it’s worth going over more information separately about brake squeal as pertains to other components in the braking system. Brake squeal can come from a variety of sources regardless of what brake pads are used. Even with the Porterfield R4-S, which is by far the most popular brake pad I sell, there can be brake squeal for any number of reasons.
Brake squeal can be caused by any of these situations:
The calipers, retention pins, spring clips, were not thoroughly cleaned during installation of the new pads.
Anti-squeal was not applied to the correct places or in adequate quantities to the retention pins, spring clips, or brake pad backing plates.
The brake rotors have pad material from the previous set of brake pads.
The brake rotors are worn out or damaged and need to be replaced.
The brake caliper pistons are seized or otherwise not moving freely.
The brake pad design is susceptible to squeal (aggressive friction material and/or lack of chamfering)
The new brake pads were not bedded in properly.
I do specify the brake pads I sell in the Redpants Online Store to be made a certain way, so I can’t speak to how the same type of pad would perform when purchased from another vendor. But for the Porterfield R4-S and Hawk HPS 5.0 brake pads, there should be no squealing whatsoever so long as they’re installed properly and none of the above conditions are an issue.
Anti-Squeal Grease

I have a love/hate relationship with anti-squeal because some of these products can make replacing brake pads a huge pain to do. The anti-squeal I like the most, use myself, and recommend to others is the CRC Silaramic Brake System Grease. It’s a high-quality product that can handle extreme temperatures, making it perfectly suited for everything from sub-zero temperatures to track days.
The reason I hate some anti-squeal products is that some of them can turn solid, making them extremely difficult to remove from the brake calipers as they’re effectively glued in place.. I’ve seen two products do this on cars I worked on: one was red and one was purple (the CRC Silaramic stuff I like is white).
The CRC Silaramic product I recommend costs about twice as much as the others, but it’s still not that expensive and will last a really long time. Its operational temperature range is from -50F (-45C) to 3000F (1650C) so it works for just about any driver in any climate or condition. And you’ll be very glad to have paid the small extra for it when it comes time to replace your brake pads again as it won’t turn solid like other products I’ve come across.

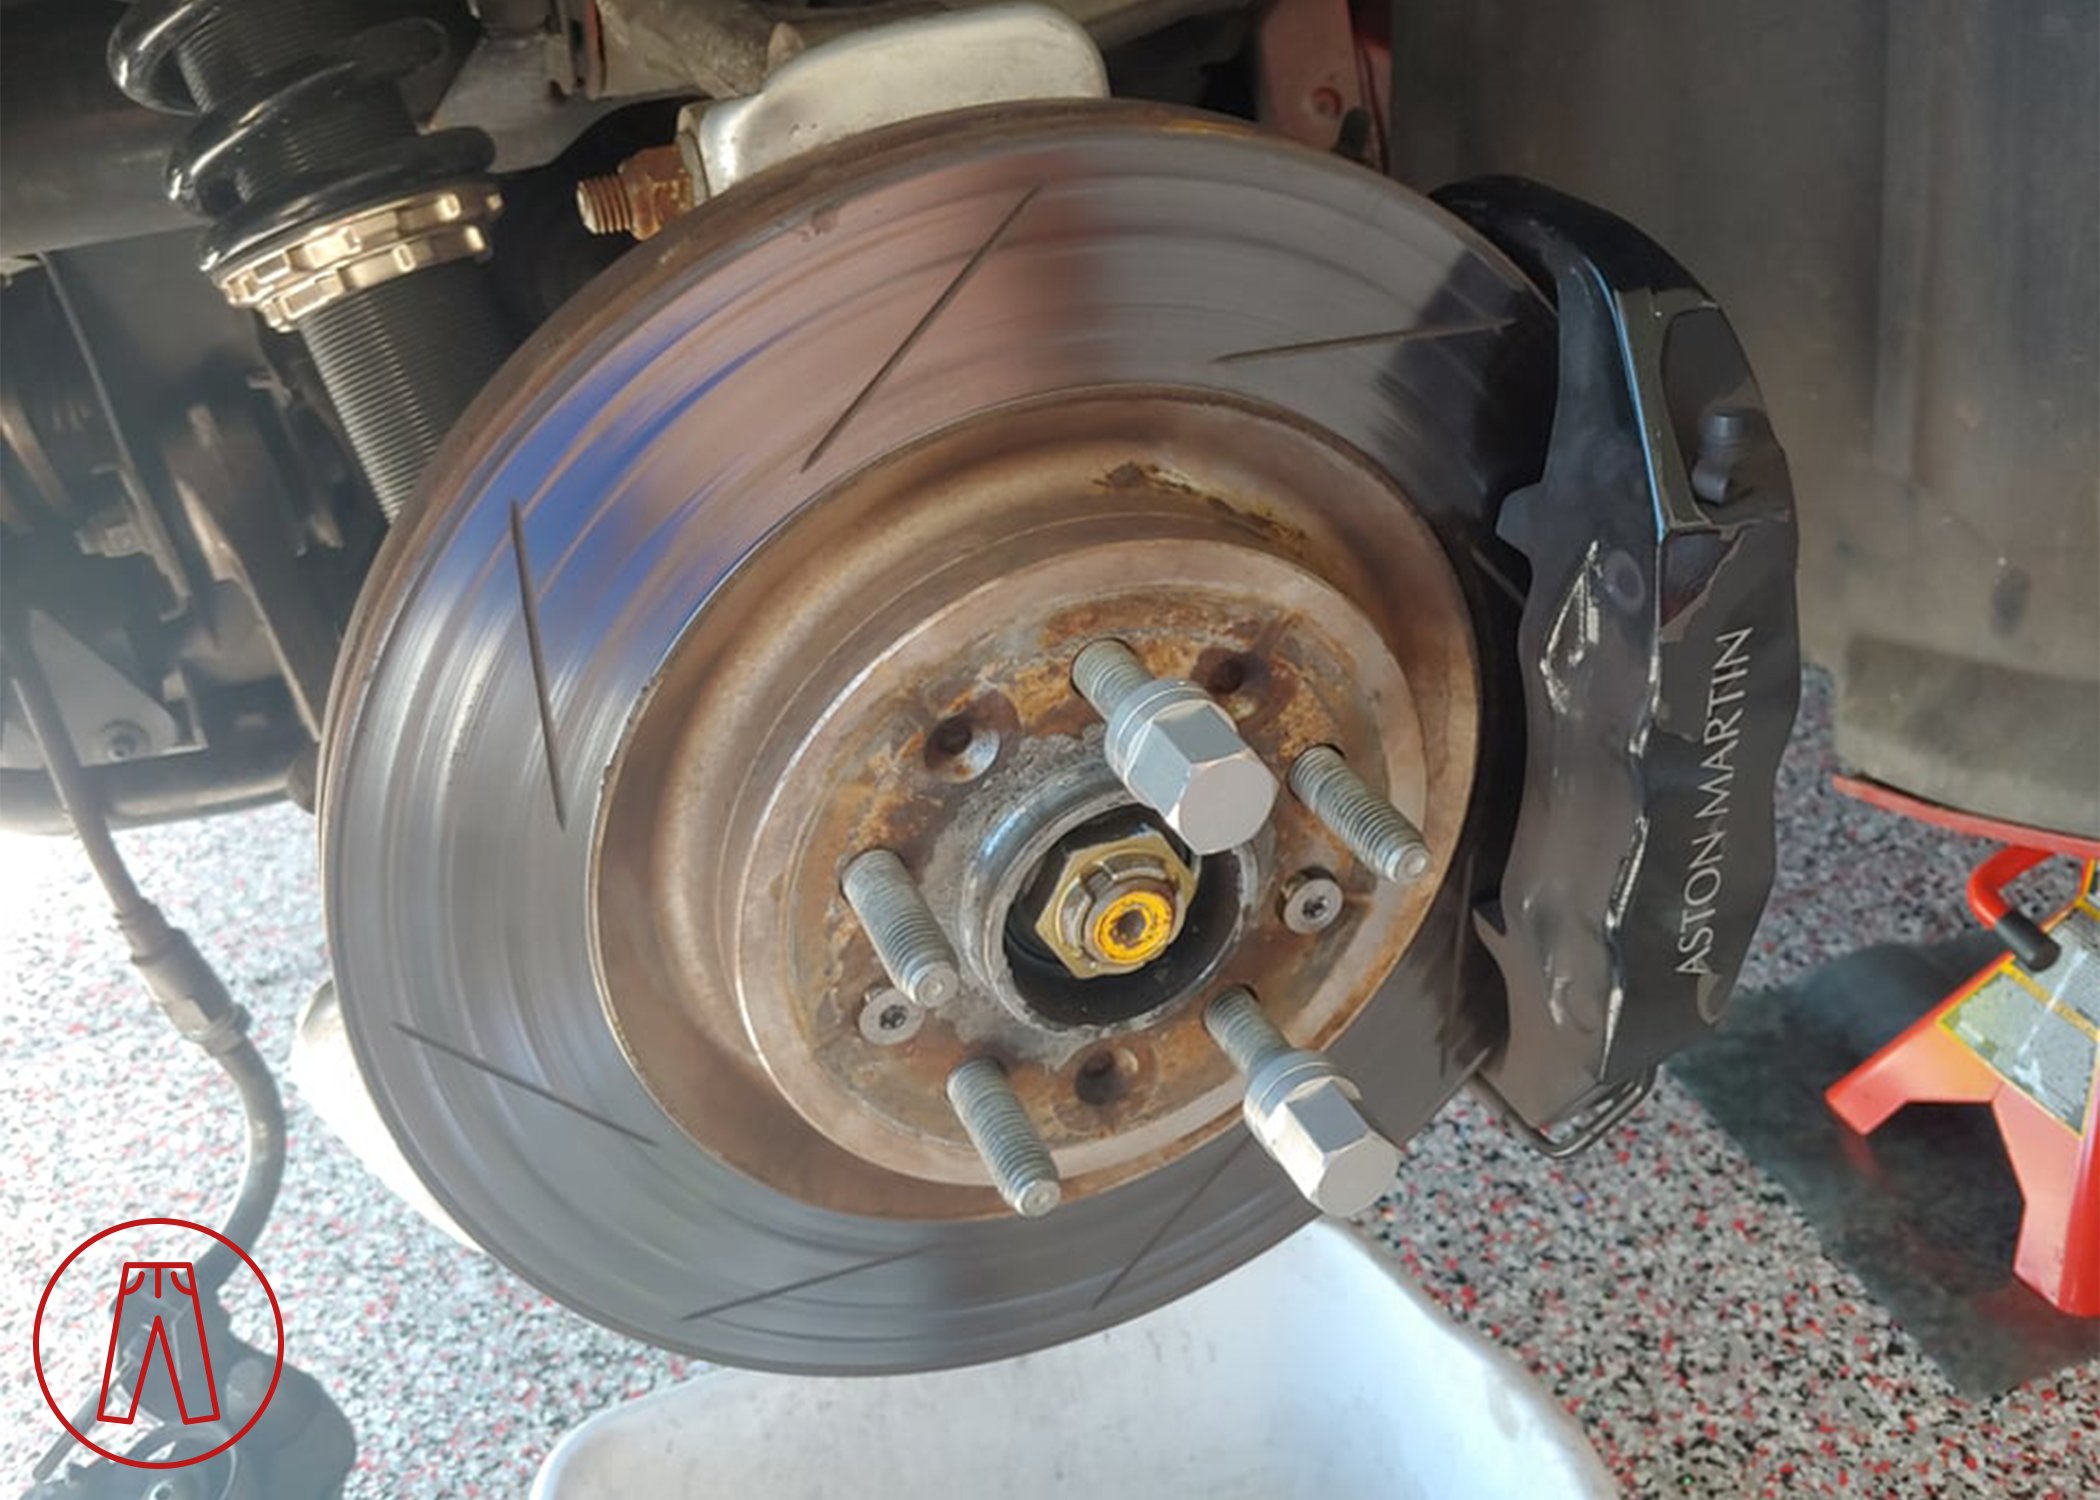
This might all seem a bit pedantic, but anti-squeal products that solidify can make a simple brake pad job a total nightmare. When I got my red 2007 V8 Vantage, for example, the brake pads that came on it had a red anti-squeal on them. The pads were completely stuck in place and so hard to remove that I had to use a punch pin and heavy mallet to knock them free. The same stuff was used on the handbrake pads, and you can see in this picture how solid the anti-squeal grease had become.
Brake Systems
The are three general brake system used on Gaydon-era Aston Martins, each available on certain cars, though they can be swapped to other cars with a bit of extra work.
The way I usually refer to them is:
The 4-piston setup
The 6-piston setup
The carbon brakes
The first two are based on their front calipers, while the last is based on its rotor type. This is just my way of doing it and I often add more detail if needed. For example, if there isn’t enough context to know we’re discussing the 6-piston set and carbon brakes, I’ll clarify a bit more because both of those systems actually use 6-piston front calipers. Again, these terms aren’t standardized by any means - they’re just my own personal way to reference the various braking systems and it’s how I’ll refer to them throughout the rest of this Information Page.
The 4-piston setup uses 4-piston front calipers with 355mm rotors and 4-piston rear calipers with 330mm rotors. All rotors used on the 4-piston setup are single-piece iron rotors, though aftermarket 2-piece rotors are available in both iron and carbon. The 4-piston setup was used on the early DB9 and V8 Vantage until around 2012. Starting at MY12.25, the base V8 Vantage switched over to the 6-piston setup. Shortly after that for MY13, the DB9 essentially became a DBS in a Virage body, carrying over many of their parts including the brake system which utilized CCM rotors.
The 6-piston setup uses 6-piston front calipers with 380mm rotors and got a different master cylinder to accommodate those larger brakes. The rear calipers and rotors stayed the same as had been previously used on the 4-piston setup. The 6-piston setup was introduced on the V8 Vantage S, which used 2-piece rotors with iron discs and aluminum hats. When the 6-piston setup was introduced to the base V8 Vantage in MY12.15, the 2-piece rotors were replaced with “1.5-piece” iron rotors - a rotor type retained many benefits of a 2-piece rotor while costing far less.
The carbon brakes use 6-piston calipers in the front and 4-piston calipers in the rear, but with 2-piece rotors using Carbon Ceramic Material (CCM, or “carbon” for short) discs and aluminum hats. This braking system was introduced on the DBS, then used for the V12 Vantage, Virage, and other cars that followed.
Interchangeability
Although many components may look the same or similar, it doesn’t mean they’re interchangeable. For example, it might be a simple assumption that the 4-piston and 6-piston brake setups used on the pre-MY12.25 and post-MY12.25 V8 Vantage are interchangeable so an earlier car could be upgraded with the larger front calipers of a later car, but that’s not really the case. In order to get the 6-piston setup onto a pre-MY12.25 V8 Vantage, you’ll need the calipers and rotors as well as the pads, retention pins, spring clips, caliper bolts, dust shields, uprights, and master cylinder.
Likewise, the 6-piston setup and carbon setup are not the same either, even though each uses 6-piston front calipers and 4-piston rear calipers. Brake pads are also different given pads designed for iron rotors may not be compatible with CCM rotors.
Some things are compatible, but others aren’t. It’s important to keep that in mind if you’re planning to change the braking system of a given car. Generally speaking, if you want to change out the brake system for a car, I recommend using all the applicable parts from the donor car to make sure everything is compatible.
Brake Rotors
Brake rotors are a major service item as far as maintenance is concerned, though they don’t usually need to be replaced as often as brake pads. There are a few different rotors available depending on the car.
Rotor Construction
Rotors are made in different ways depending on their intended use. There’s the way the rotor itself is built and the material it’s made from, which is what I’ll cover here. There’s also the way the surface of the disc is designed and within the rotor are vents that help keep the rotor cool, but those are two bigger topics that apply to all cars in general so feel free to get lost in those topics of you want. For the sake of keeping on topic with Aston Martins, I’ll only be talking about the build (“pieces”) of a rotor and disc material (iron or CCM).
The most basic rotor type is a one-piece iron rotor. It’s the cheapest type to make and gets the job done. They’re a single piece made completely of iron. They weigh the most compared to other rotor types, but they also cost the least.
Something of a blend of the 1-piece and 2-piece construction types is the 1.5-piece rotor used on the Rapide, MY12.25+ V8 Vantage, and other cars. It uses a single-piece design but large sections are removed between the disc and hat to reduce weight. It has some performance benefits from a 2-piece rotor and some of the cost savings from a 1-piece rotor.
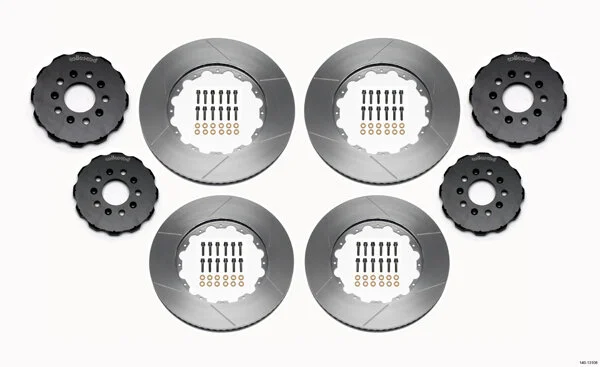
(c) Wilwood
A more performance-oriented rotor type is a two-piece iron rotor. The disc is made of iron and the hat is made of aluminum, each part benefiting from the metal type used to make them. These have the benefit of lower weight, better heat management, and being rebuildable. The downside is they’re far more expensive than one-piece brake rotors. For example, the 2-piece rotors cost nearly twice as much as the 1.5-piece rotors that are the same size.
The most performance-oriented rotor type is the carbon rotor. Carbon rotors are 2-piece designs using a Carbon Ceramic Material (CCM) disc with an aluminum hat. Although these are the same construction type as a 2-piece iron rotor, CCM is much lighter than iron. They also have the benefit of being able to withstand brake fade better and be more consistent when at operating temperatures. The downside is that carbon rotors often need to be warmed up to get their ideal performance, and they’re insanely expensive to replace.
4-Piston Setup Rotors
Cars with the 4-piston setup use a 355mm one-piece iron front rotor and 330mm one-piece iron rear rotor. Standard service life is based on rotor thickness. The factory specs are:
Front rotor initial thickness: 32mm
Front rotor minimum thickness: 30mm
Rear rotor initial thickness: 28mm
Rear rotor minimum thickness: 26mm
The standard service life assumes the rotors haven’t been warped or otherwise damaged, which would necessitate them being replaced at that time even if they haven’t gotten down to the minimum thickness.
There aren’t any factory options for different brake rotors but some aftermarket ones are available, like the 2-piece Wilwood rotors I’ve been using on my 2007 V8 Vantage for quite a while.
6-Piston Setup Rotors
Cars with the 6-piston setup use a 380mm front rotor and 330mm rear rotor. The V8 Vantage uses 2-piece iron rotors in the front while the base V8 Vantage and other cars use the 1.5-piece iron rotors. The rear rotors are the same 1-piece iron brake rotors used in the 4-piston setup. The factory specs are:
Front rotor initial thickness: 34mm
Front rotor minimum thickness: 32mm
Rear rotor initial thickness: 28mm
Rear rotor minimum thickness: 26mm
The standard service life assumes the rotors haven’t been warped or otherwise damaged, which would necessitate them being replaced at that time even if they haven’t gotten down to the minimum thickness.
The 2-piece rotor used on the V8 Vantage S is interchangeable with the 1.5-piece rotor used on the base V8 Vantage. For the majority of owners I’ve talked with, “downgrading” from the 2-piece to the 1.5-piece rotor is a great way to reduce maintenance costs in a way that won’t be too obvious and will have minimal performance drawbacks. Likewise, the 2-piece rotors can be used as an upgrade for people with the base V8 Vantage.
Carbon Setup Rotors
Cars with the carbon rotor setup use rotors made of Carbon Ceramic Material (CCM). Unlike iron rotors, CCM service life is based on weight rather than wear. Even so, they do still have a minimum which is extremely close to the initial thickness. Here are the factory specs for the DBS’s CCM rotors:
Front rotor initial thickness: 36mm
Front rotor minimum thickness: 35.5mm
Rear rotor initial thickness: 32mm
Rear rotor minimum thickness: 31.5mm
The standard service life of a CCM rotor is based on its weight, and that minimum service weight will be etched into the rotor hat. The minimum weight is listed in grams, and the disc should be discarded if it is 10g or less above the minimum weight.
CCM rotors use weight as the primary service life factor instead of thickness because they don’t typically wear down like iron rotors do. While an iron rotor will be worn down and get thinner, a CCM rotor generally won’t. Instead, the carbon fibers will oxidize when the discs get very hot (500C+), and the oxidized carbon fibers will cause the rotor surface to deteriorate. Visually, this looks like long, shallow pitting on the rotor surface - as if rice had been scattered across it.
In addition to minding the weight of the rotor and the surface deterioration, it’s also possible for a rotor to get cracked or otherwise damaged.
Since CCM rotors are so expensive to replace, it isn’t uncommon for people that do lots of track days to swap out the carbon setup for a 6-piston setup with iron rotors. It’s a big up-front investment, but it quickly pays for itself when you realize the CCM rotors cost tens of thousands of dollars to replace.
Brake Pads
Brake pads are a very common topic that I discuss with customers because they’re the source of so many complaints. The bottom line is that Aston Martin builds their cars to go really fast - some can even top 200 mph (322 kph), and that means they also need to equip braking systems that can handle those speeds.
High performance braking systems come with downsides. Cost aside, the main compromises are that the more performance-oriented the brakes are, the more dust and noise they’ll make. That’s a pretty reasonable trade-off given the way brakes work, but the issue for most Aston Martin owners is that they’ll never drive fast enough to get the benefits of the high performance braking. They will, however, constantly deal with the drawbacks. It doesn’t matter if a braking system can handled a hardcore track day if all an owner ever does is cruise to brunch on the weekend. So, this is one of those areas where the braking system can be changed in a major way to better improve ownership, so long as it’s done in a way that maintains performance to match how the car is being driven.
Warning: Reduction of a braking system’s performance capabilities can lead to serious harm or total loss of persons and/or property. Do not make any changes that would cause a braking system to be incapable of performing as required.
Because the OEM pads gets so many complaints from owners, I’ll sort my thoughts on brake pads based on substitution options. The ones I use as examples in this section are the ones that I’ve used and that I sell in the Redpants Online Store, but other options are available if you want to research those.
Note: Any brake pad can have brake squeal. This can be due to any number of factors. Read the General Brake Information section above for more details.
Brake Pad Wear Sensors
Wear sensors are used to alert the driver when the brake pads have been worn down and need to be replaced. There are four brake pad wear sensors on the car with one being located at each brake caliper. Brake pads that have a notch cut into them to accept these sensors will be able to use the sensors even if the pads aren’t OEM - this is the case with the Porterfield R4-S and Hawk HPS 5.0 brake pads that I sell in my Online Store. If a pad does not have the notch cut out, then the sensors will not be compatible.
The sensors have a bump that sticks out slightly. When the pad is worn down, this bump will come into contact with the brake rotor. Being sheared by the brake rotor is what makes the sensor trigger the warning that alerts the driver that the pads are low and need to be replaced. Because the shearing is how the sensors operate, once a sensor has triggered the warning, the sensor must be replaced. Sensors that have not triggered a warning can be reused with new pads, but be careful when removing them from the old pads and installing them on the new ones as used sensors can be very brittle and might break, potentially rendering them useless.
4-Piston Setup Pads
Choosing pads for the 4-piston setup can be a little tricky because it requires far more compromise than the 6-piston setup. The front pads on the 4-piston setup are fairly small, so choosing the right pad compound for your intended use is critical.
The vast majority of my customers tell me they don’t track their car so they want something that can handle casual to spirited driving while creating as little dust and noise as possible. My go-to pad here is the Porterfield R4-S, which gets overwhelmingly positive reviews. These pads produce extremely little dust and are silent, making them perfect for people that don’t really push their car too hard. My red 2007 V8 Vantage was never tracked, so I kept the R4-S pads on it and was very happy with them.
I used to get a lot of questions about the suitability of these pads for track days and I advised against it and even tested them on track myself. If you’re doing a casual drive on track and not actually pushing the car hard - as the case would be in a “precision driving” session, then the pads are okay for track use. But if you’re doing at-speed runs on track, I’d absolutely advise against using the R4-S on track with a 4-piston setup.
The pad Porterfield makes for track use is the R4. This pad has incredible stopping power and really impressed me, despite being in the smaller 4-piston setup on my 2007 V8 Vantage. But as awesome as they are on track, they’re equally horrible on the street. These things create a massive amount of dust and squeal like nobody’s business.
If you want the best of both worlds, you can get a set of R4-S pads for street use and swap in a set of R4 pads for track days. I did this a few times and it worked just fine, albeit with extra time needed before and after track days to swap pads. If you want one pad that can act as a halfway point, I’d suggest the Hawk HPS 5.0 brake pads.
The Hawk HPS 5.0 does create a moderate amount of dust, but it is silent. The only time I’ve had squeal from the HPS 5.0 was after I did a track weekend. The first few days following the track time, I did have occasional squeal when coming to a stop. After a few days it faded and went away completely, and I never heard it again. I’ve been driving on the Hawk HPS 5.0 pads for quite a while and even though I’d like them to have less dust, I like the way they feel and that they can handle both street and track duty.
6-Piston Setup Pads
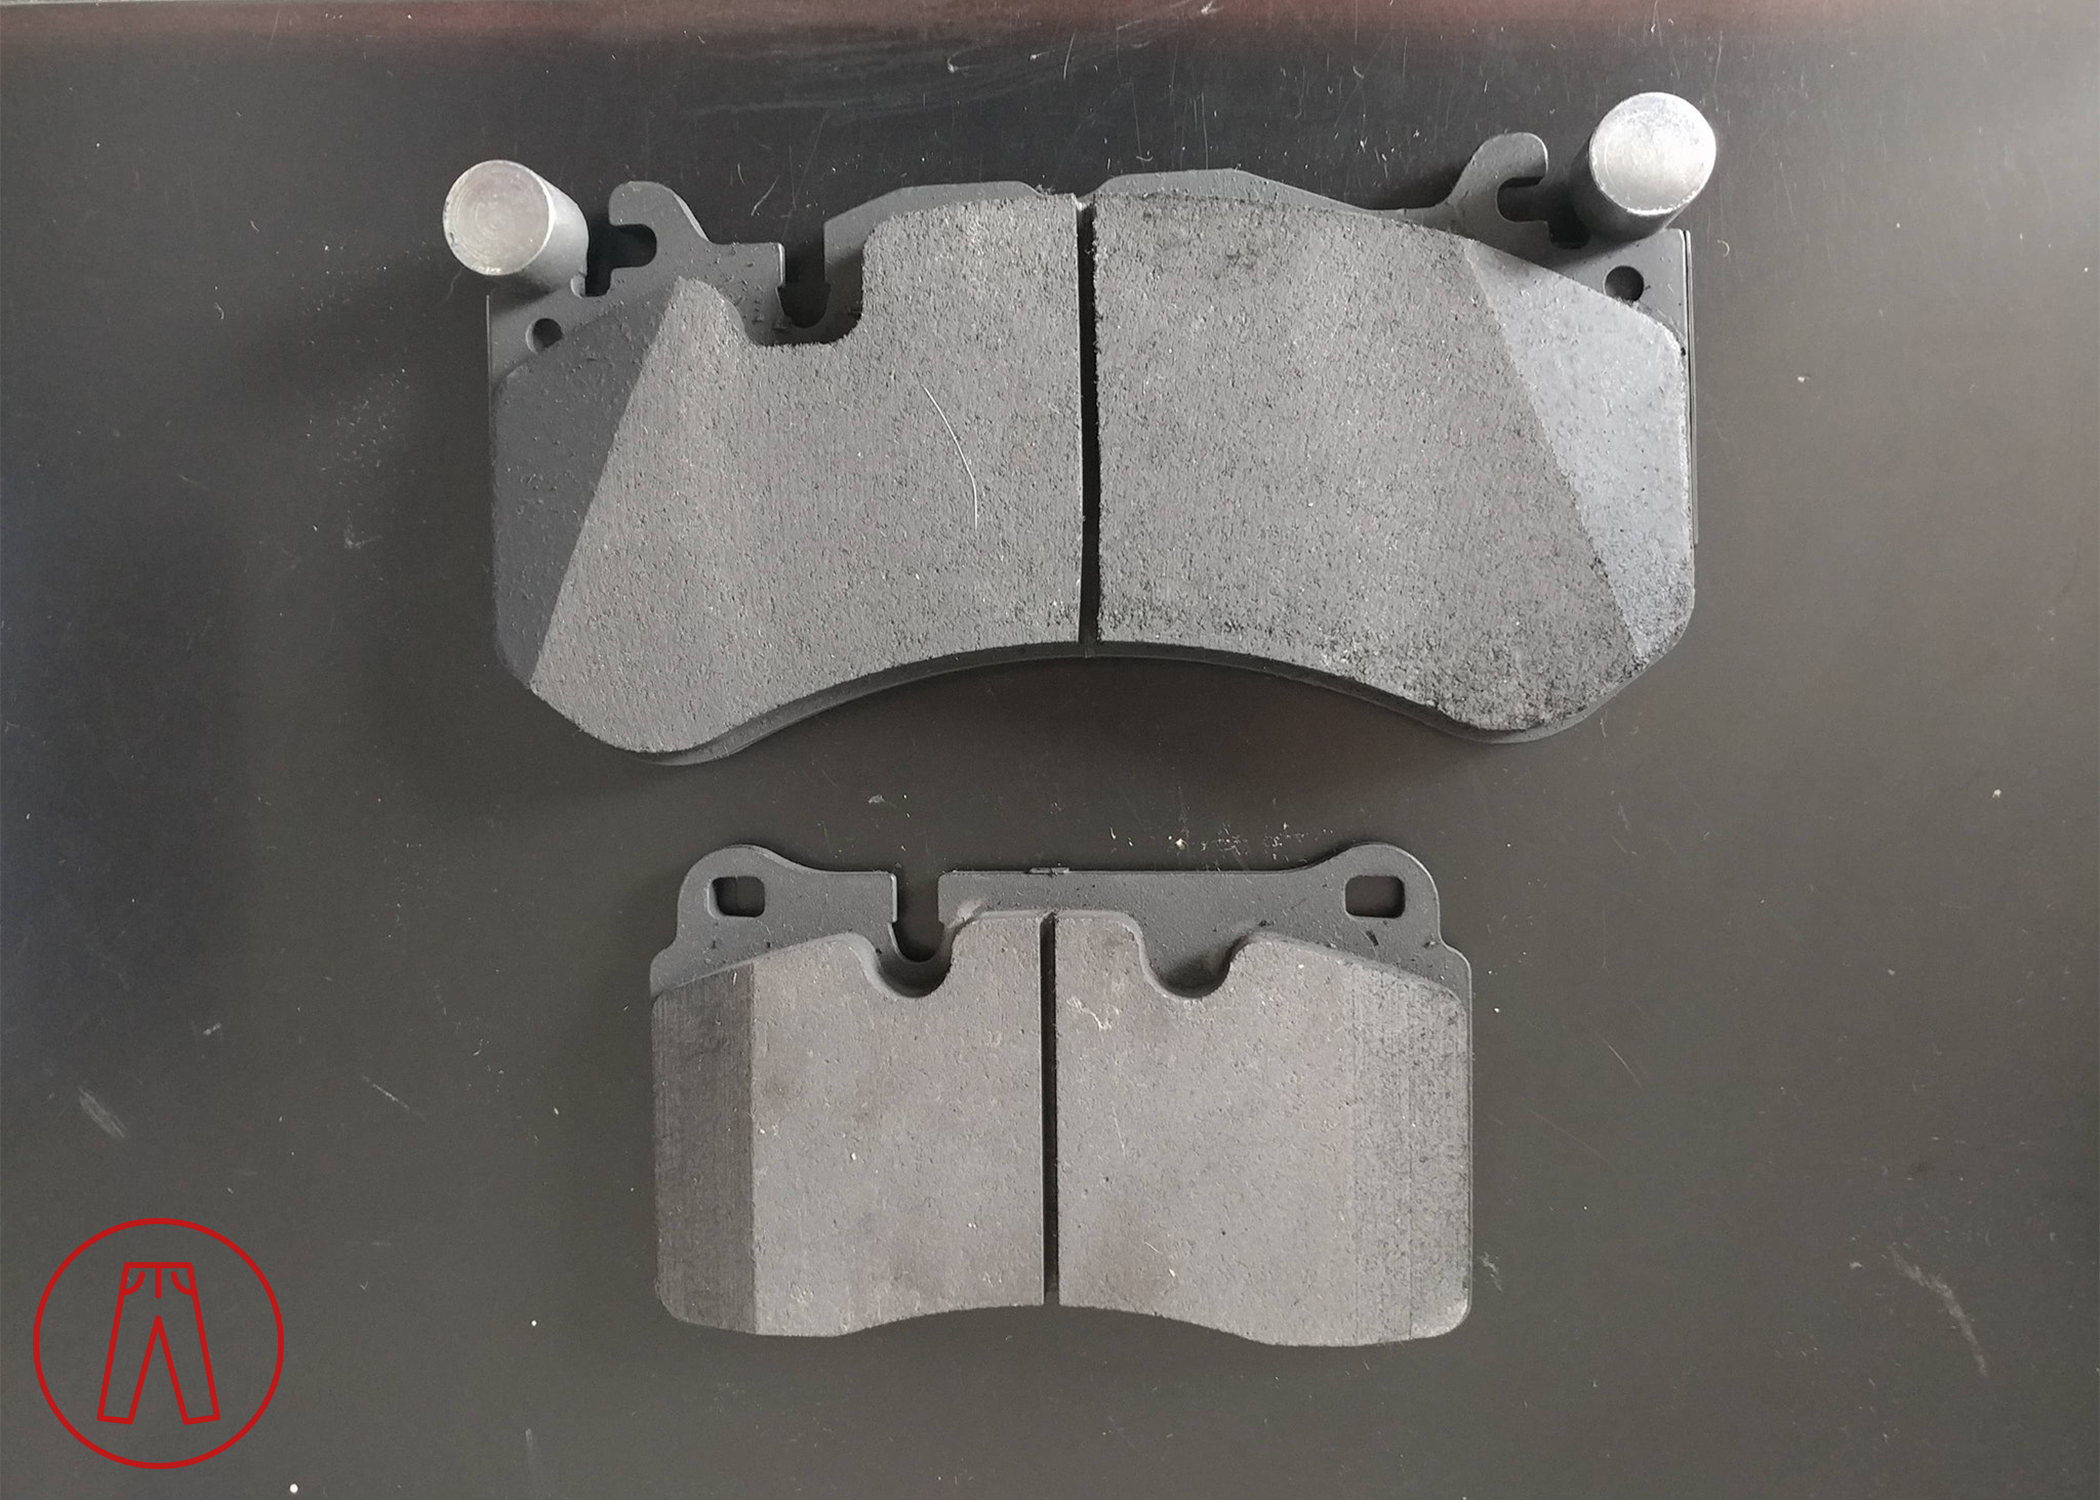
The beauty of the 6-piston setup is the front pads are massive, so you can get away with using a “gentle” pad like the Porterfield R4-S and still do track days. I wasn’t so sure about it until I went out for some laps around Lime Rock as a passenger with my buddy Dan, who uses the R4-S in his V8 Vantage S. He put down some blazing fast lap times and never had an issue with braking.
The reason this is possible is because of how much larger the pads are in the 6-piston front calipers compared to the early 4-piston front calipers. Here’s a picture comparing the two.
A quick note is that the Porterfield R4-S pads for the 6-piston calipers have changed a little and now include an embedded sensor. If the sensor doesn’t fit the sensor connector for your car, you can cut the wire off at the base of the sensor (against the pad) to effectively disable it. The pads will still have the sensor slots so the factory sensor can be used on the pads.
Pads for CCM Rotors
Brake systems that have carbon-based rotors need pads that are designed specifically for them. There are incredibly few options available for these due to how limited the market is, but I did manage to get pads made using the Pagid RSC1 compound to fit Aston Martins with CCM rotors! The front pads and rear pads are kept in stock in the USA, and I have them tailored the same way I do the Porterfield R4-S and Hawk HPS 5.0 pads I sell to reduce the chance of brake squeal and make them easier to install with the factory brake pad wear sensors.
The RSC1 compound is an evolution of design compared to what’s been used thus far for carbon rotors. It should provide better performance all around compared to the factory pads.
Brake Pad Options and Fitment Guide
Here are the brake pads I offer and a couple comments on each one. The comments are based on a variety of inputs including manufacturer guidance, first-hand experience, and actual testing. The part numbers and references are either the manufacturers’ or my own. I specify brake pads my own way to best suit my customers - pads provided by other vendors may not be the same.
Click here for bedding instructions for all the brake pads listed below.
Hawk HPS 5.0
The Hawk HPS 5.0 is designed for street and occasional track use, even for an early DB9 or V8 Vantage with 4-piston front brake calipers. This is the brake pad I use on my supercharged 2007 V8 Vantage for both street and track.
For a car with 4-piston front calipers, this is a great pad for all-around driving including track days. If you do occasional track days and don’t want to have to switch between street- and track-dedicated pads, this is a great in-between.
For a car with 6-piston front calipers, this is a slightly aggressive pad for street and track. If you drive the car really hard, this is a great option. If you don’t, then the Porterfield R4-S may be a better option as that one has less dust and a lower price.
2012-2018 V8 Vantage / S / GT, front*
2010-2018 Rapide / S, front
2018+ DB11, non-CCM rotors, front
2019+ Vantage (AM6), non-CCM rotors, front
2005-2012 V8 Vantage and DB9, front
2018+ DB11, non-CCM rotors, rear
2019+ Vantage (AM6), non-CCM rotors, rear
2005-2012 V8 Vantage and DB9, rear
2012-2018 V8 Vantage / S / GT, rear
Pagid RSC1
Pagid designed the RSC1 brake pad as an all-around brake pad for carbon-based rotors, like Aston Martin’s CCM (carbon ceramic matrix) brake rotors. These pads have high modulation and are friendly on those obscenely expensive carbon rotors.
2008-2012 DBS, front
2011-2012 Virage, front
2012-2018 Vanquish / S, front
2013-2017 DB9, front
2013-2018 V12 Vantage / S, front
2008-2012 DBS, rear
2011-2012 Virage, rear
2012-2018 Vanquish / S, rear
2013-2017 DB9, rear
2013-2018 V12 Vantage / S, rear
Porterfield R4
The Porterfield R4 is the racing variant of the R4-S brake pad. This pad is made specifically for track and racing use and I highly recommend it not be used on the street (yes, I tested them - they were phenomenal on track but the insane squeal in normal street driving conditions was awful, even ignoring the high dust levels). I highly recommend this pad for dedicated track use but don’t recommend it for street use due to the dust and squeal. I did not have any cold-temperature stopping issues with this pad in my own testing on the street, so it is usable in normal driving if you can bear the dust and squeal.
2005-2012 V8 Vantage and DB9, front*
2017+ DB11, non-CCM rotors, rear
2019+ Vantage, non-CCM rotors, rear
2005-2012 DB9, rear
2010-2018 Rapide / S, rear
2005-2017 V8 Vantage / S / GT, rear
Porterfield R4-S
The Porterfield R4-S is the street variant of the R4 brake pad. It’s by far the most popular brake pad I sell and gets rave reviews. Keep in mind that this pad is fine for track use if you have 6-piston front brake calipers, but it cannot handle track use if you have 4-piston front calipers (yes, I tested them and got really bad brake fade in two fast corners on the track, nearly plowing straight through Turn 1 at one point). These also get extremely positive reviews from people with 2nd Century cars like the DB11 and 2018+ Vantage because they have a more progressive initial bite and pedal feel, making them less “grabby” in stop-and-go traffic.
2012-2018 V8 Vantage / S / GT, front*
2010-2018 Rapide / S, front
2018+ DB11, non-CCM rotors, front
2019+ Vantage (AM6), non-CCM rotors, front
2005-2012 V8 Vantage and DB9, front*
2017+ DB11, non-CCM rotors, rear
2019+ Vantage, non-CCM rotors, rear
2005-2012 DB9, rear
2010-2018 Rapide / S, rear
2005-2017 V8 Vantage / S / GT, rear
Brake Fluid
Brake fluid is a routine service item that can have a major impact on your braking system’s ability to function. Just like brake pads, brake fluid can be chosen based on its intended use, but with fewer downsides to be concerned about. So long as you’re choosing the right specification of brake fluid (DOT 4, DOT 5.1), the main differentiation will be the dry and wet boiling points. Generally speaking, the higher the boiling points, the higher the performance and the higher the price.
The easiest way to think about dry and wet boiling points is to remember that brake fluid absorbs water over time. The older the brake fluid, the more water will be in it. New brake fluid hasn’t absorbed much or any water, so it’s dry. Old brake fluid would have absorbed water, so it’s wet. You can then consider a dry boiling point to be the temperature at which a roughly-new brake fluid will boil, and a wet boiling point is the temperature at which a roughly-old brake fluid will boil. That’s a pretty loose explanation, but it’s an easy way to understand it. If you want a more technical explanation, there’s tons of that on the internet.
I sell Motul products and use them in my own cars so I’ll be using those as examples to explain options, but others are available if you want to do your own research and find something different.
For most people that drive their car anywhere from casual to spirited, a normal brake fluid is just fine. This would be the Motul DOT 5.1 brake fluid. It’s a great quality product at a low price, and perfectly suitable for a car that isn’t tracked.
If you want more protection, Motul RBF 600 is the next step up. It’s twice as expensive as the DOT 5.1, but still a reasonable price for a service that only needs to be done every two years. It’s what I recommend to anyone that wants the extra security in case they’re an aggressive driver or do an occasional track day.
For people that do more than a few track days a year, I recommend the Motul RBF 660. It’s more expensive still than the RBF 600, and about three times as expensive as DOT 5.1, but still a reasonable cost to ensure your brakes perform they way they should.
There’s no downside for using a higher-performance brake fluid than needed except for the cost. You can use RBF 660 in a car that only goes to the grocery store without any issues at all - you’ll just be paying more for the fluid. However, if you’re using a brake fluid not rated for a given use - say, DOT 5.1 during a hard weekend at the track - the brake fluid may boil and your brakes may not work. If you’ve ever done a track day and felt your brake pedal go soft, you know how big of a deal this can be. So, make sure you choose your brake fluid according to its intended use.
Manual Transmission Clutch Line
The clutch line in the manual transmission cars uses the same fluid as the rest of the braking system so I highly recommend flushing the clutch line when flushing the brake fluid for the rest of the system. It only takes an extra minute or two and it can have a major impact on how the clutch feels and performs.
I cover this topic in more detail on my Transmission Information Page but it’s worth mentioning it here, too.
Handbrake System
Gaydon-era Aston Martins use a ratcheting cable-operated handbrake system for the parking/emergency brake. Each of the two rear rotors has an additional single-piston caliper that engages and disengages based on operation of the handbrake lever inside the cabin. The calipers are on sliding pins so they automatically adjust as the handbrake pads are worn down, and cable adjusters are used to compensate for cable stretch.
Unlike the fluid-operated calipers used for the main braking system, the handbrake uses a winding brake caliper. This means the caliper has to be wound back into the caliper rather than pushed in. A special tool is needed for this so be ready if you want to do this job yourself.
Handbrake Chirp
It’s not uncommon to hear a chirping sound when driving at very low speeds, like in a parking lot. It often sounds like it’s coming from the front of the car, but it’s actually comin from the rear. The source of the chirping is usually the handbrake pads. Diagnosis is easy - just pull up on the handbrake lever and see if the noise stops or changes. If so, you know it’s your handbrake pads.
The quick “band-aid” solution for getting rid of the chirp is to drive in reverse and pull up on the handbrake lever to press the handbrake pads into the rotor. You don’t have to fully engage the handbrake. All you’re doing is pressing the pads into the rotor for a moment. This will clear off the buildup causing the chirp. Do that once or twice and the chirp will go away until more buildup has accumulated and starts causing the chirp again.
The more permanent solution is to either chamfer your current handbrake pads, or replace them with handbrake pads that are already chamfered. Since replacing the handbrake pads is a bit of a chore but the pads themselves are really inexpensive, I usually recommend people just get new pads. I worked directly with Porterfield to get handbrake pads made in their popular R4-S compound and chamfered to prevent the chirp from ever happening.
Handbrake Light
If you release the handbrake and the handbrake light stays lit in the gauge cluster, it could be that you didn’t fully or properly release the handbrake or that the sensor didn’t register that the handbrake was released.
Releasing the handbrake requires holding down the button on the level to disengage the ratcheting mechanism and holding the button until the lever is all the way back down. If not done correctly, the handbrake won’t actually release.
It’s possible that the handbrake sensor gets dirty or otherwise stops working as well as it should. If this happens, the sensor won’t register that the handbrake has been released, even if it has been, and the warning light will stay on in the gauge cluster. If this happens and you know you released it properly, try holding down the button on the lever and jiggling the lever a bit. That can get the sensor to register the handbrake has been released and the handbrake warning light will turn off. If jiggling the handbrake does make the light turn off, you’ve probably just verified that the sensor needs to be cleaned or adjusted.