
Oil Catch Can Installation
DISCLAIMER
As always, follow all safety protocols. Don't undertake this task if you aren't comfortable with it, fully understand it, and are capable of completing it. The information provided may be incomplete or inaccurate. You are ultimately responsible for anything you do. Neither Redpants, LLC or myself is responsible or liable for anything that may occur.
This DIY is near and dear to my heart because it's the instructions for installing the first part that I designed for the V8 Vantage! Started as a project on my own car, this kit took off in popularity and was essentially the beginning of Redpants, LLC.
Needed
Oil Catch Can Kit
8mm socket
10mm socket
Ratchet
Allen keys
Before You Begin
This oil catch can is not the same as the factory air-oil separator. If that item is leaking on your car (which it is often prone to do), check out that DIY Guide to fix it.
An oil catch can collects and stores oil. It must be drained or the oil within it can block a vital vent passage, leading to damage of the engine. The Redpants Oil Catch Can has enough storage capacity to go a few years between draining for many people, but I still highly recommend and urge owners to drain it as part of their annual oil change.
Wondering why an oil catch can is even worthwhile? Check out the first 4 minutes of this video:
Step 1
Attach the hoses to the catch can. The long one goes on the top hose nipple, and the short one goes on the bottom hose nipple. (The Allen head screw at the bottom of the can is the drain port. Do not turn over the can to drain.) Use the zip-ties to prevent oil from getting out from between the hoses and can. I included extra zip-ties so you can use them where the connectors fit into the hoses as well.
Step 2
Remove the hard plastic tube going from the PCV to the intake manifold. You'll notice that one side of the quick-release on the tube at the PCV side is pointed down. I've found that a long, flat-head screwdriver can be used to push in that side while using your finger to push in the top side.
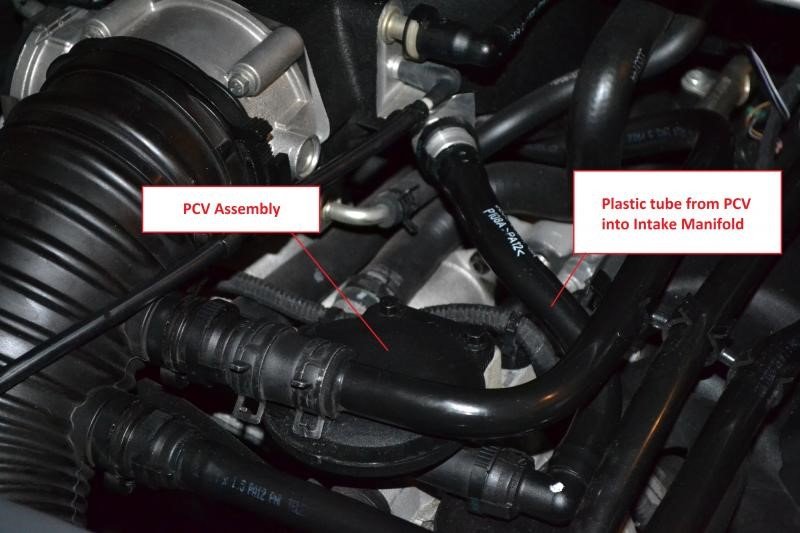
Bag and tag the plastic tube for later use in case you decide to remove the kit. Clean any oil you find in the PCV outlet or intake manifold inlet.
Step 3
Remove the bolt holding the power steering fluid reservoir in place. It will spring open so be very careful not to lose the bolt when it comes loose.

Step 4
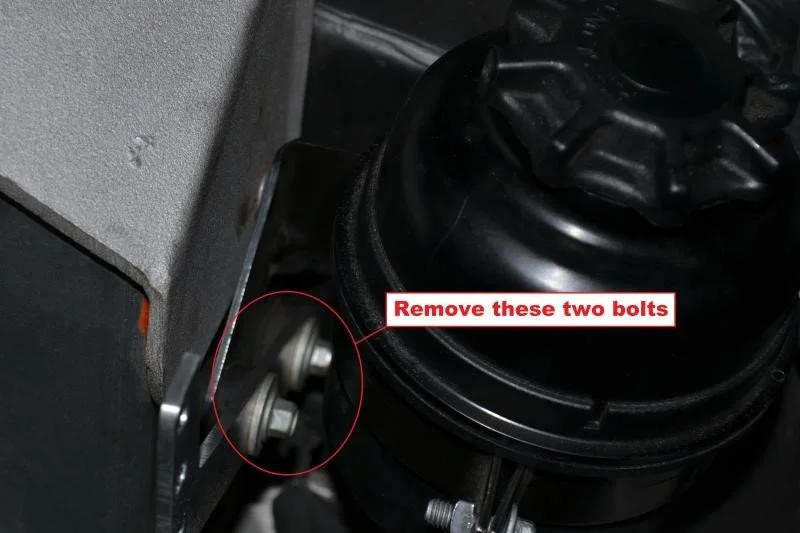
Move the power steering fluid reservoir to the side so you can access the next two bolts. DO NOT disconnect the hoses from it! Use the 8mm socket to remove those two bolts.
Step 5
Install the catch can mounting bracket and re-install the two bolts you just removed. The bracket will go between the bolt heads and the rubber isolators. DO NOT over-tighten the bolts! Inside the rubber isolators there are metal cylinders that can crush if the bolts are over-tightened. Once the two bolts are back in and the catch can mounting bracket installed, return the power steer fluid reservoir to its place and reinstall the bolt to keep it in place.

Step 6
Install the catch can! I've found that the easiest way to install the catch can is to put on the hoses first (as in Step 1), then position the can in place with the hoses pointing toward the back of the car, then rotate it to align the hoses with the PCV and intake manifold.
There are three hard plastic hoses that run parallel to each other. The long hose coming from the top of the catch can will go above these and connect to the intake manifold. The short hose coming from the catch can will go below the three hard plastic hoses and connect to the PCV. Once the hoses are connected, the catch can will rest in place.
Step 7
Use the 10mm socket and allen key (5mm, I think) to install the three bolts (or just two, if you prefer) to attach the catch can to its mounting bracket. It should now look like this:

And that's it, you're all done! Just make sure you drain it every once in a while. I typically drain mine every 3-4 months, but I also drive my car very often and very hard. Most people might only need to drain it one or two times per year. It's very easy to drain. In fact, I show exactly how to do the entire process in this 6-minute video: