
Coilovers Installation DIY Guide
DISCLAIMER
As always, follow all safety protocols. Don't undertake this task if you aren't comfortable with it, fully understand it, and are capable of completing it. The information provided may be incomplete or inaccurate. You are ultimately responsible for anything you do. Neither Redpants, LLC or myself is responsible or liable for anything that may occur.
A popular modification to almost any car is to install a set of coilovers. Coilovers can vary greatly in cost, build quality, and how they affect the car, so you’ll want to do your research to make sure you’re getting the right ones to suit your own criteria. I installed a set of the coilovers I designed with BC Racing on my grey 2007 V8 Vantage as the basis of this DIY Guide and accompanying video. Previously, I’d done the same job on my red 2007 V8 Vantage to develop and test the prototypes before they went into full production. The job is actually very straight forward on our Aston Martins - just a few nuts on the top and a bolt at the bottom. The fronts can be done in as few as 15 minutes, but the rears tend to be more difficult.
This DIY Guide is based on replacing the coilovers as a complete unit but can also be used for replacing individual components. If you’re just replacing the springs, for example, you’ll just need to do the extra steps for swapping the springs the same as if you would on any car.
Needed
New coilovers (optional)
15mm, 18mm, 19mm, and 21mm long-handle wrenches
10mm, 13mm, 15mm, 18mm, 19mm and 21mm sockets
T40 Torx bit
Ratchets for the above sockets and bit
Painters tape
3 or 4 hours
Torque Ratings
Front lower control arm forward bolt to subframe: 185 Nm. (137 lb/ft)
Front lower control arm rearward bolt to subframe: 115 Nm. (85 lb/ft)
Front upper control arm bolts to chassis: 115 Nm. (85 lb/ft)
Rear lower control arm bolt to subframe: 115 Nm. (85 lb/ft)
Rear upper control arm bolts to subframe: 115 Nm. (85 lb/ft)
Coilover top nuts: 22.5 Nm. (17 lb/ft)
Coilover bottom bolt: 175 Nm. (129.5 lb/ft)
Sway bar end links: 110 Nm. (81.5 lb/ft)
Before You Begin
This DIY Guide is structured assuming you’re doing all four corners at the same time and you’re doing the front and then the rear.
While this can be done as a one-person job, it’s much easier if you have a second person to help out.
The upright assembly is also commonly called a knuckle, knuckle joint, and Aston Martin refers to it as a vertical link. I’ll be referring to it throughout this DIY Guide as an upright assembly.
Coilovers (among other suspension components) should not be replaced individually. Rather, they should be replaced in pairs. For example, if you’re replacing the front left coilover, you should also replace the front right coilover. Failure to do this can lead to handling or even safety issues.
An alignment should be done after replacing your coilovers or doing any suspension work that affects the car’s suspension geometry.
WARNING: Avoid straining the brake lines when moving the control arms or upright assemblies. Stretching these can result in damage and the possible loss of braking performance while driving.
Step 1
Break the lug nuts loose on each wheel, then get the car on jack stands or use a lift.
Remove all four wheels and all four fender liners.
Put a couple layers of painters tape over the lip of the fender near where the coilovers are. This will help prevent damage to the paint of the car if part of a coilover accidentally hits the edge of the fender during removal or installation.
Step 2
Use the T40 Torx bit and ratchet to remove the four bolts holding the main strut brace, then set the strut brace aside.

Remove the three nuts holding each the strut brace mounts in place, then set the strut mounts aside. Re-thread one of the nuts part-way onto each of the coilover tops where the strut brace mounts had been. These will keep the coilovers from falling out later on.
Step 3
Remove the two bolts that connect the front upper control arm to the chassis.

Pull the upper control arm outward to give clearance for the coilover. The upright assembly can lean outward as well to give more space for the coilover.
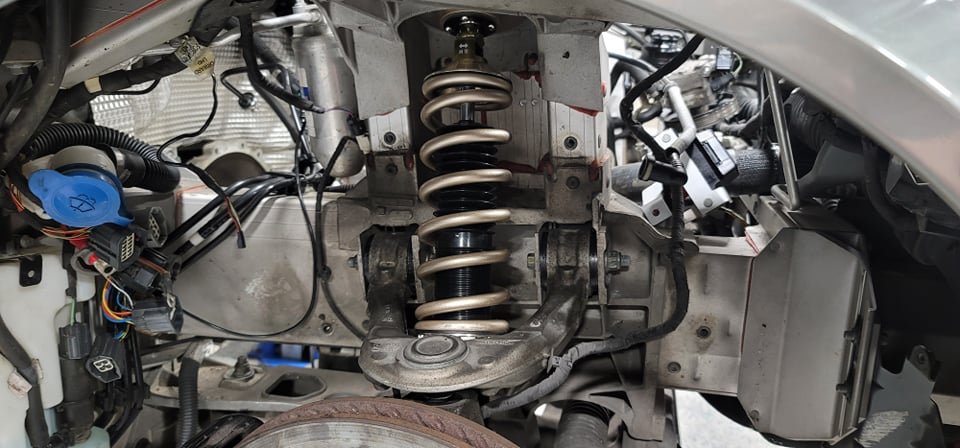
Step 4
Remove the bolt at the bottom of the coilover.

Step 5
Pull down on the upright assembly so the bottom of the coilover comes out of its mounting point. While holding the weight of the coilover, remove the partially-threaded nut at the top of the coilover.
Carefully pull the coilover free from the suspension, minding the various items inside the fender and the fender itself.
Step 6
Repeat Steps 5 through 3 in reverse for installing the new coilover, including reinstalling the strut brace mount at its top.
Step 7
Repeat Steps 3 through 6 for the front coilover on the other side of the car.

Step 8
Remove the bolt that secures the outer end of the rear lower control arm to the upright assembly and the bolt at the bottom of the coilover to the rear lower control arm. If you are having too much difficulty moving the lower control arm after removing these two bolts, it can help to loosen the bolts holding the lower control arm to the subframe.
Step 9
Remove the bolt holding the fuel filler pipe to the upper coilover mount, then remove the four bolts holding the upper coilover mount to the chassis.

Step 10
Pull down on the lower control arm to give the coilover clearance to drop down, then remove the coilover (and attached upper mount) from the fender area by raising it up and over the upright and brakes.
Step 11
Remove the upper coil mount from the old coilover and transfer it to the new one.

Step 12
Repeat Steps 10 through 8 in reverse for installing the new coilover.
Step 13
Repeat Steps 8 through 12 for the rear coilover on the other side of the car.
Step 14
Make sure all the fasteners are properly attached and torqued, then reinstall the fender liners and wheels.
Check to make sure none of the bushings are binding or creaking, there are no knocking sounds in the suspension, or any other issues.
Get a full alignment.
And that’s it!