
Fuel Vapor Recirculation Hose Repair
DISCLAIMER
As always, follow all safety protocols. Don't undertake this task if you aren't comfortable with it, fully understand it, and are capable of completing it. The information provided may be incomplete or inaccurate. You are ultimately responsible for anything you do. Neither Redpants, LLC or myself is responsible or liable for anything that may occur.
If you’re having the stalling problem I discussed in my article, this DIY Guide will walk you through checking and repairing a potential cause of that stalling. Keep in mind that this isn’t a difficult job, but it’s tricky because you can only get one hand into the fuel tank at a time and you’ll be working by feel at least part of the time.
In the rear hatch of an Aston Martin is a bit of a shelf - that's your gas tank. Remove the carpeting and you'll see a round access port with a bunch of bolts keeping it in place. Open that up and you're inside your gas tank. IF YOU DO THIS YOURSELF BE VERY CAREFUL. If you attempt this, you do so with no guarantees expressed or implied from me - I'm just a dude on the internet. You're working with a tank of gas - it's explodey. Keep flames, sparks, etc of all sorts far away.
Side note: This is one of a few potential causes for the engine stalling and is not guaranteed to fix a stalling issue.
WARNING: This job involves opening and working within the fuel tank of the vehicle. It is extremely dangerous. Do not attempt any portion of this task if you do not fully understand and accept the dangers, hazards, issues, explodies, etc, involved with such a task.
Needed
New fuel tank access port gasket
T30 Torx bit (maybe - see Step 1)
10mm socket
Ratchet
Hose cutters
New hose clamp
About an hour
Step 1
Remove the six tie down hooks (circled in the pic below). They shouldn’t be on tight so you won’t need tools to get them loose. If you do need a tool to get them loose, use the T30 Torx bit and ratchet. Don’t ask me why they call them tie down hooks. They don’t tie anything down and they aren’t hooks.
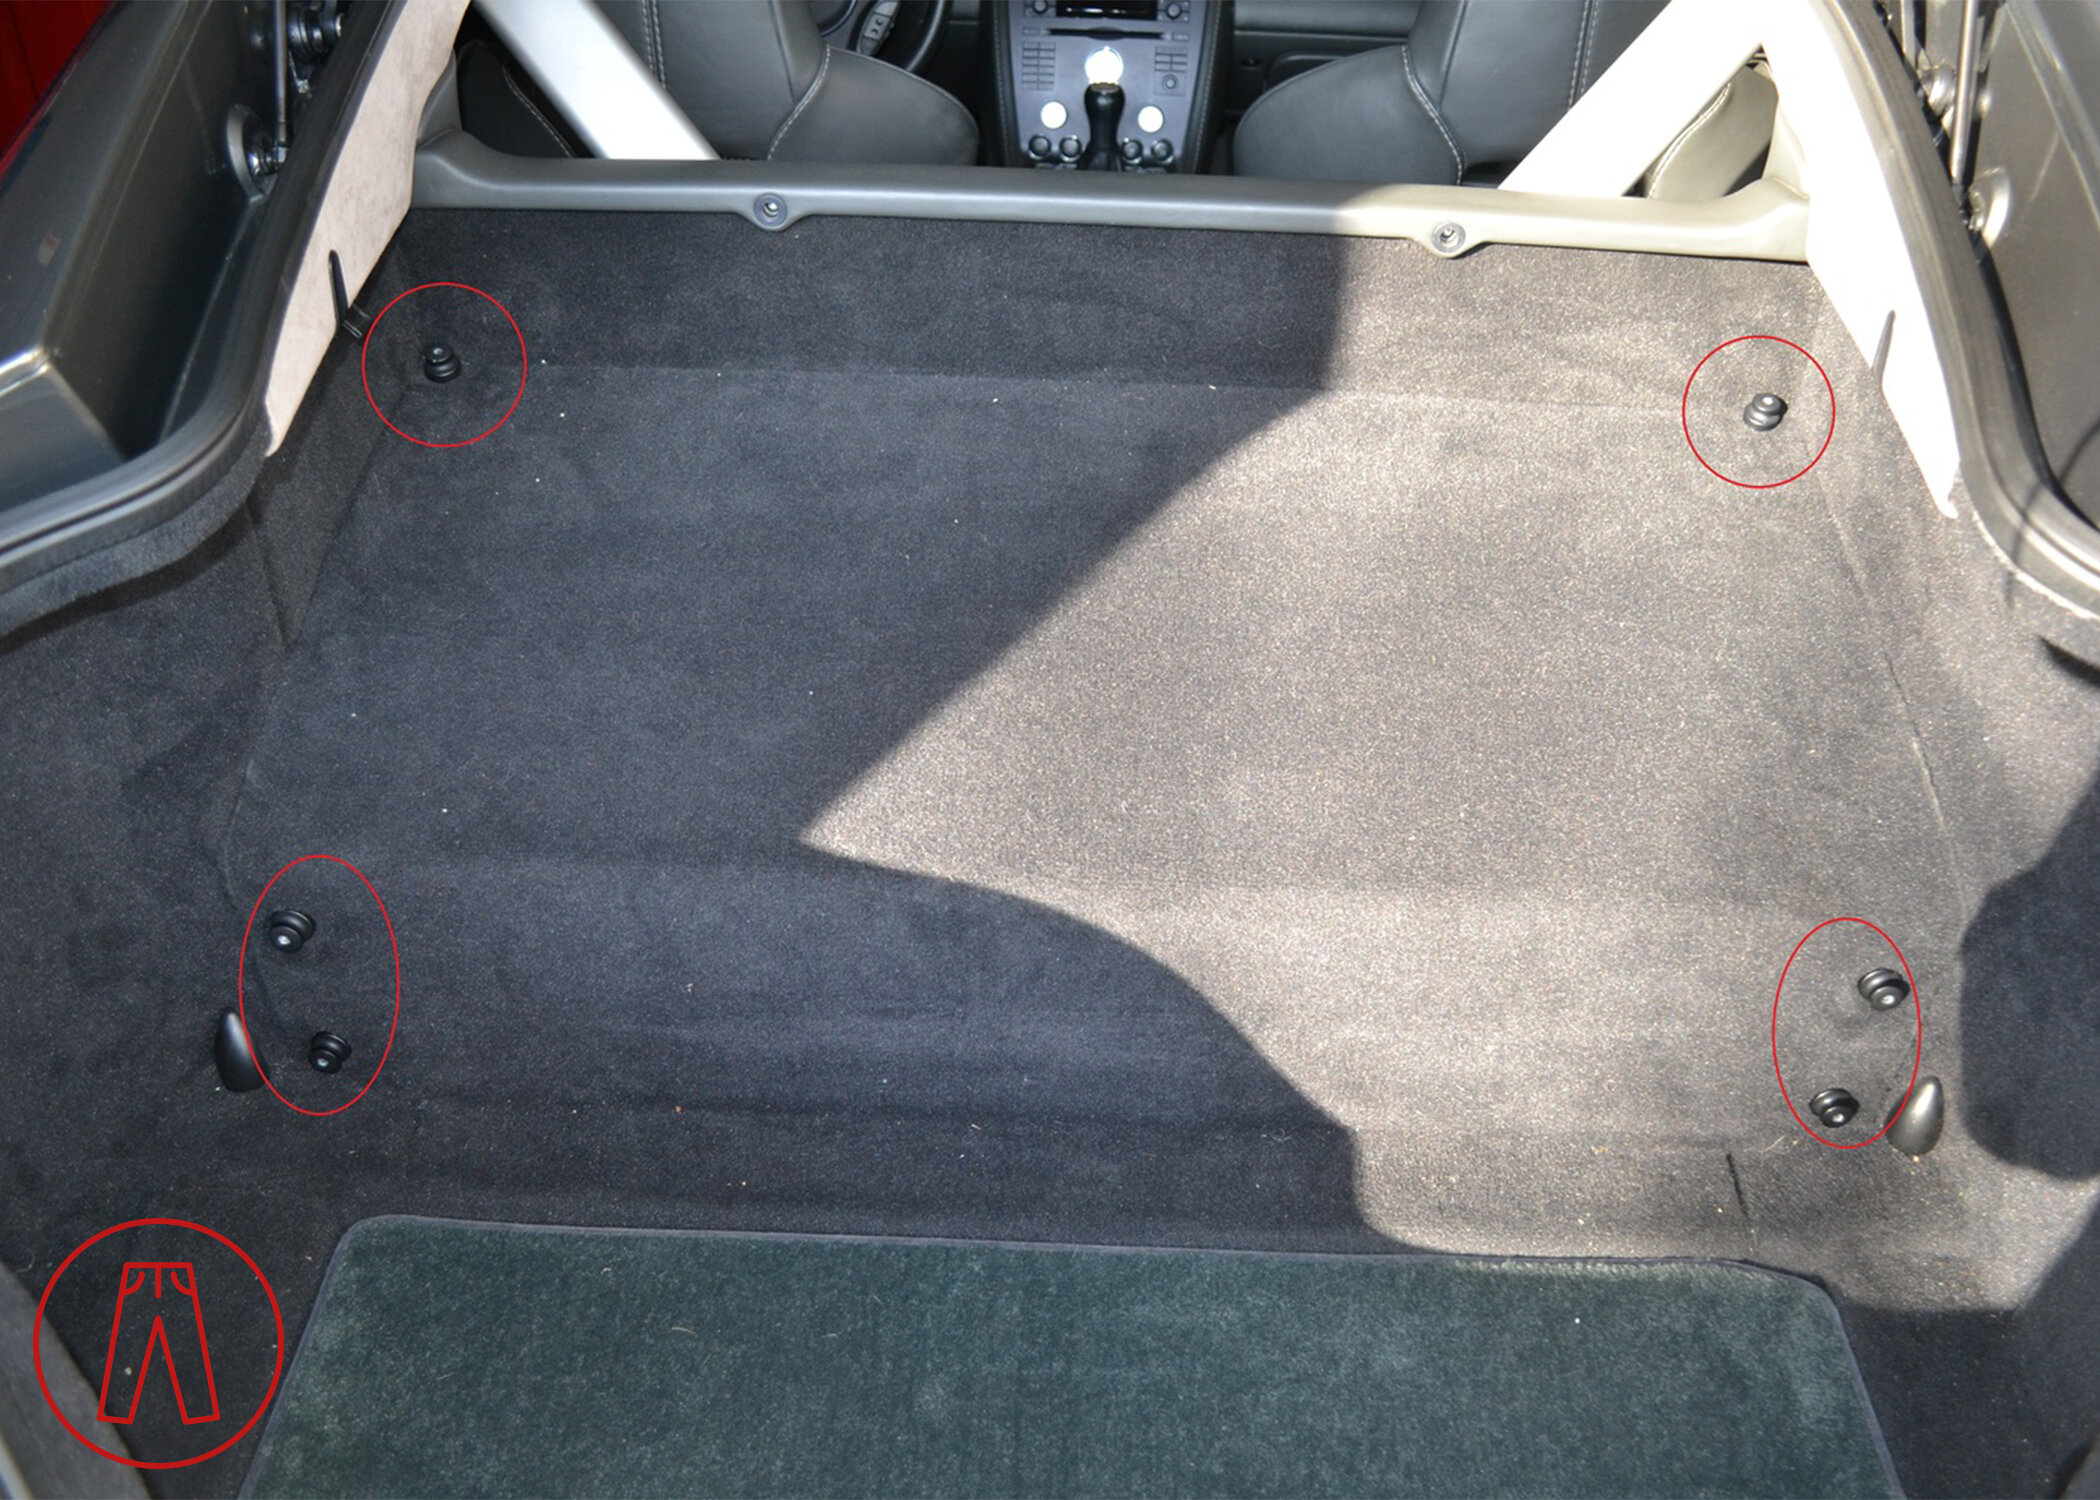
Once they’re off, you can pull the carpet up out of the way. The top edge of the carpet won’t come loose (it doesn’t need to). I find it easiest to get hold of the carpet at the base, where it goes down into the flat bottom of the trunk. There’s just enough of a lip to get your fingers in there and pull it up, bringing up that flat bottom carpet as well. Remove the flat bottom, then pull up the carpet that covers the fuel tank.
Step 2
In the middle of the foam pad is a circular section. That’s the fuel tank cover. The circular foam pad is stuck on top a flat metal disc. On the bottom of the flat metal disc is a foam gasket which is basically double-sided tape with a foam core. It’s likely to tear in half through the foam. If you’re careful, you might be able to get it out in one piece. If you’re trying to preserve the gasket, be extremely careful as you pull the cover up. If you have a new gasket, just pull the gasket up and then peel the remnants off the cover and fuel tank.
To remove the fuel tank cover, pull up on the metal disc from the bottom lip (closest to the rear of the car).

As you can see, my gasket didn't survive. Once removed, you’ll see the fuel tank service cover.

Step 3
Use the 10mm socket and ratchet to remove the M6 nuts on the fuel tank service cover to open the access port.
Step 4
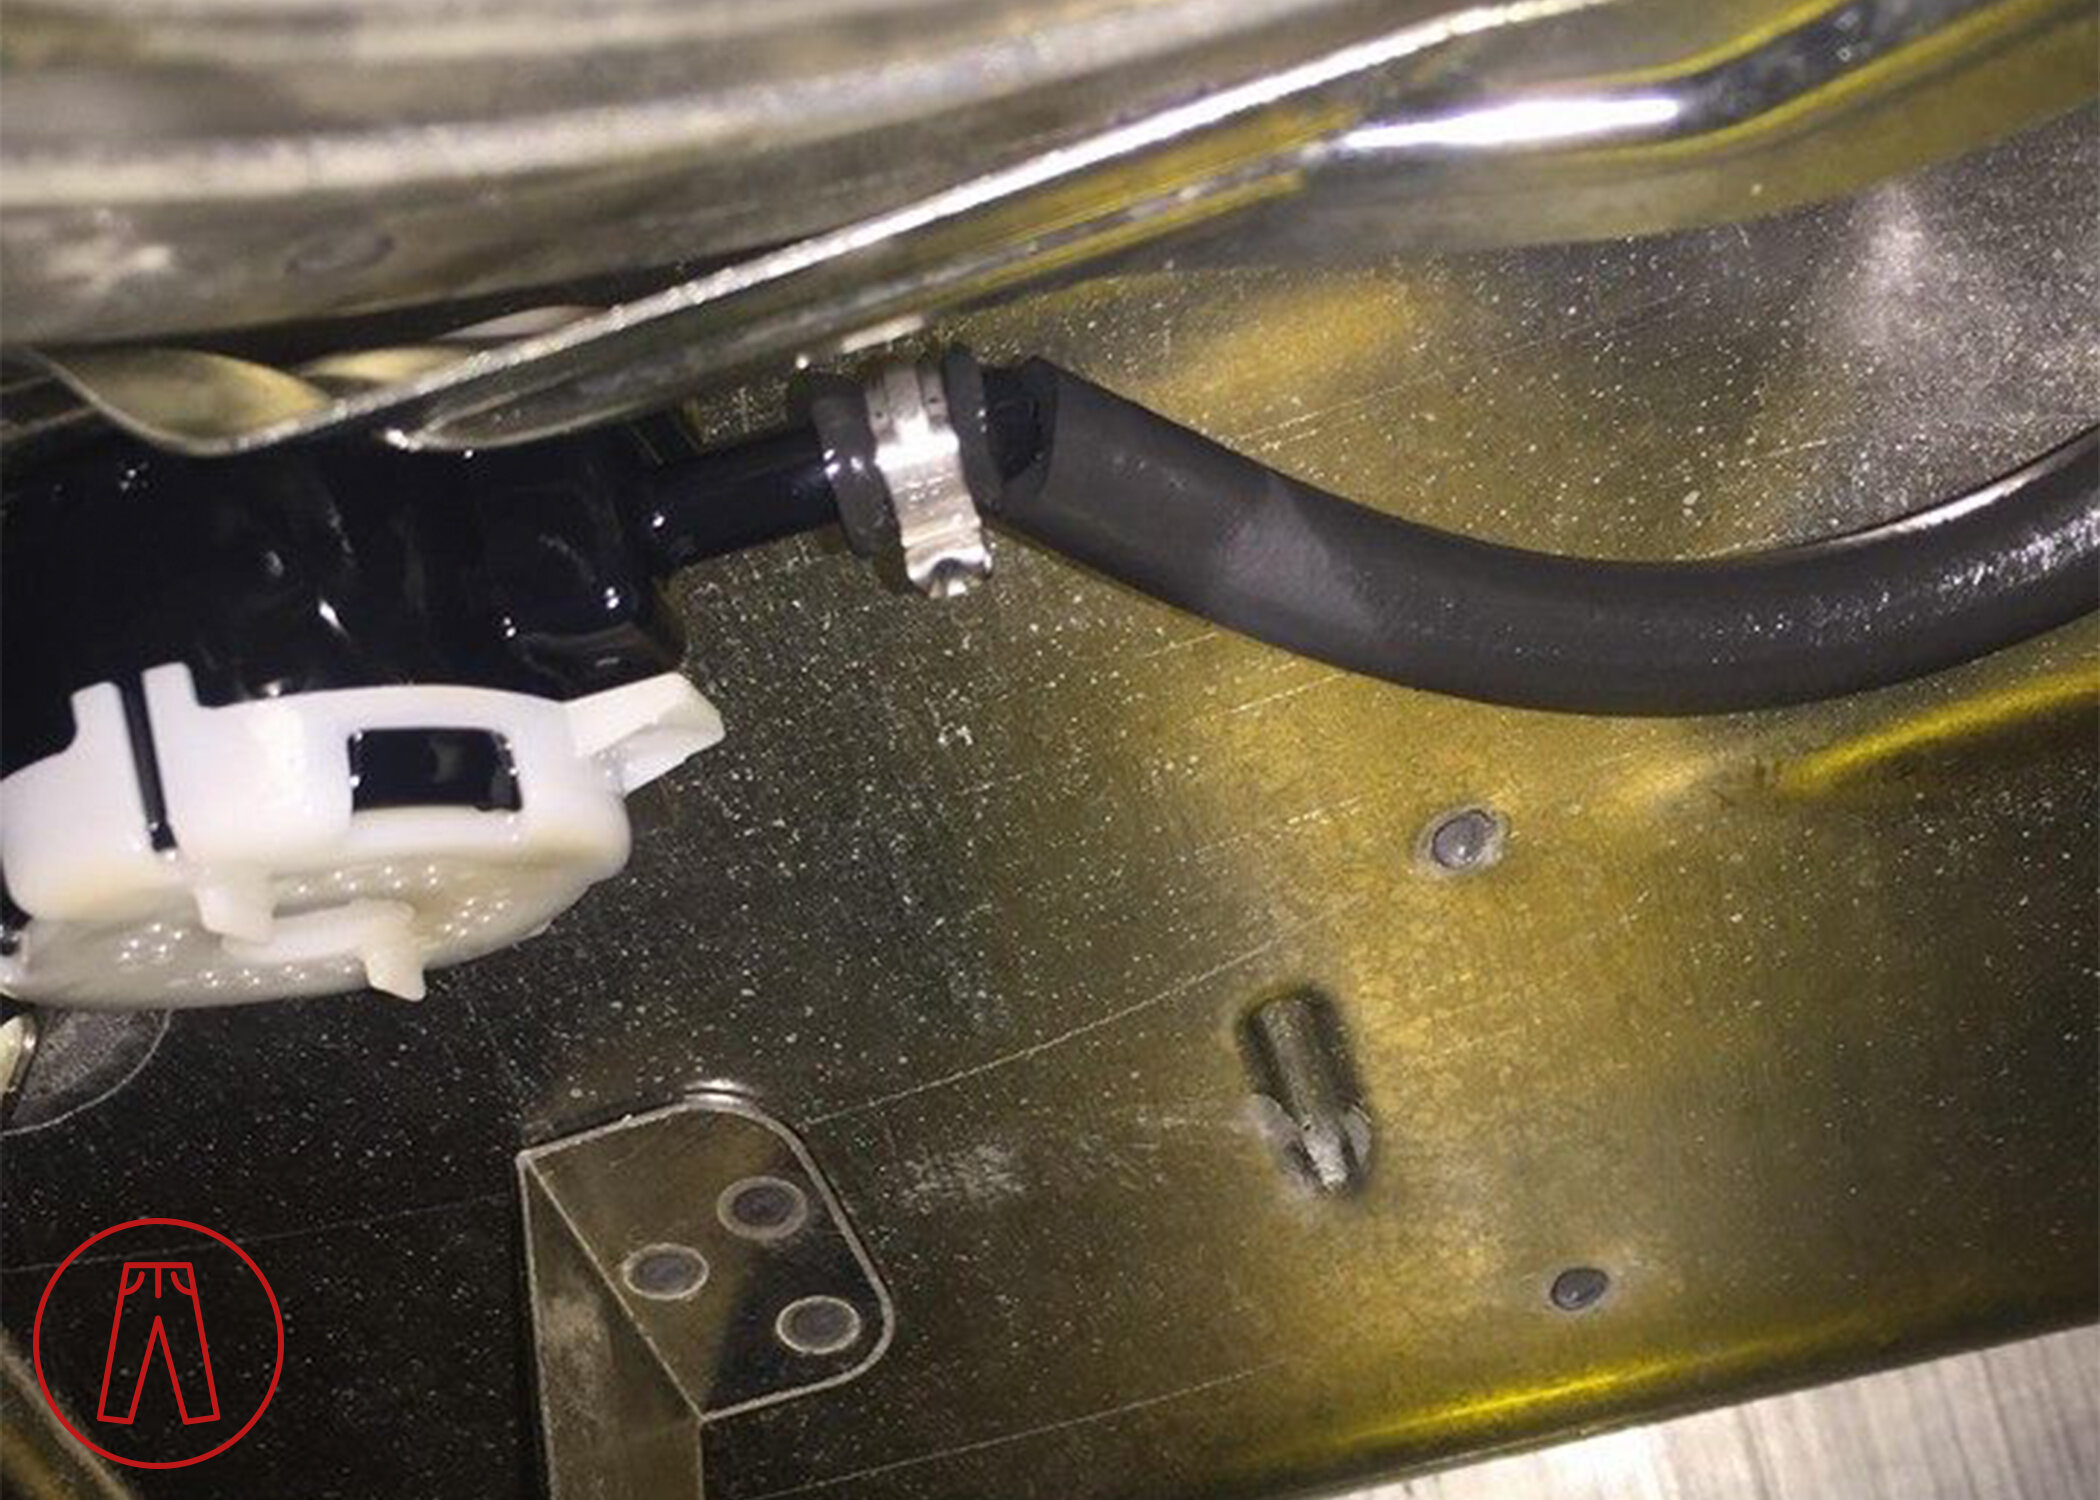
You can now check to see if the fuel vapor recirculation hose is in fact broken. It might just be split open (carefully feel the hose itself, especially near the valve) to check for splits or tears. If it is split or completely broken, remove the clamp and broken hose end from the valve.

Step 5
Cut the broken end of the main hose away so you have a clean end. Slide a new clamp onto the hose, connect the hose back onto the valve, and then position the clamp and secure it.
Step 6
Reinstall the fuel tank service cover.
Note: Best practice is to use a new fuel tank access port gasket as the original may not fit properly after removed. It’s also cheap insurance to make sure your fuel tank stays sealed so you don’t get any contamination into the fuel tank and you don’t get any fumes in the cabin.
Step 7
Reinstall the fuel tank cover. Another best practice here is to use a new foam gasket but this [in my opinion] isn’t as critical as the fuel tank gasket.
Put the carpeting back in place, hand-tightening the tie down hooks. Put the flat carpet floor back in and press it into place.
And that’s it!